)
In the image, you can see my OpenStack LAB topology. I am running four KVM Virtual Machines, one VM for the Cloud and Network Controller, and three VMs for Compute Nodes.
Swift or the object storage solution in OpenStack is a kind of service totally new to me, I have never worked before with this technology type, however, I was able to understand the purpose and how to manage the service in an OpenStack environment.
What is Swift?
The OpenStack Object Store project, known as Swift, offers cloud storage software so that you can store and retrieve lots of data with a simple API. It’s built for scale and optimized for durability, availability and concurrency across the entire data set. Swift is ideal for storing unstructured data that can grow without bounds.
Main Components:
- Proxy servers – Handle all of the incoming API requests.
- Rings – Map logical names of data to locations on particular disks.
- Zones – Isolate data from other zones. A failure in one zone does not impact the rest of the cluster as data replicates across zones.
- Accounts and containers – Each account and container are individual databases that are distributed across the cluster. An account database contains the list of containers in that account. A container database contains the list of objects in that container.
- Objects – The data itself.
- Partitions – A partition stores objects, account databases, and container databases and helps manage locations where data lives in the cluster.
Swift Internal Architecture:
Swift follows a three-later model or three-ring model, account, containers, and objects, these layers are responsible for organizing the object storage process.
The Account Ring: is an SQLite database for internal use by Swift for user account management. This SQLite database is replicated to all the servers in the object storage. This ring only contains information related to the users that are registered in the object storage.
Container Ring: is an SQLite database replicated over all the servers, keeps track of all containers, and communicates with the Account Ring to know which container belongs to which user.
The Object Ring: manages the objects in the object store by mapping them to files. This ring knows which objects exist in the object store and where to find them.
Working with Swift in OpenStack:
In my lab, I have a project named finance and the user tester, so let’s login to the cloud controller via ssh and source the tester’s user-run control file:
Load the finance’s run control as follows:
#source keystonerc_finance
To work with Swift we can use Swift’s CLI python utility “swift,” but first let’s create a sample file named finance_file:

The first thing to do is try to upload a file, as follows:
#swift upload finance_container1 finance_file

The command above will create a container “finance_container1” and will upload the file finance_file created previously.
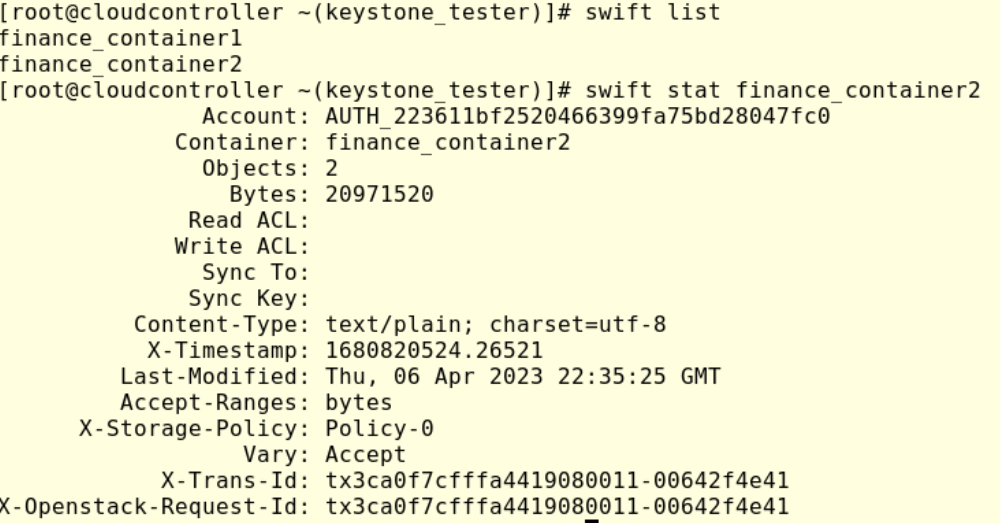
To check we can run the command #swift stat:
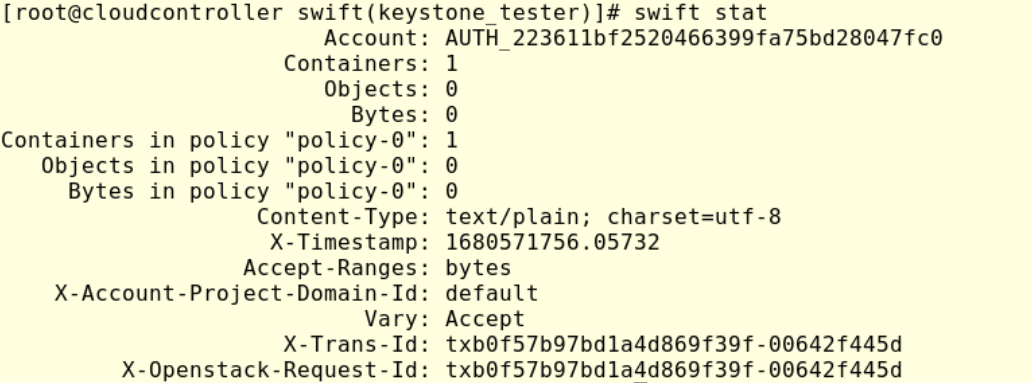
We can note that Swift has created the account AUTH_223611bf2520466399fa75bd28047fc0, this ID matches the finance project ID finance 223611bf2520466399fa75bd28047fc0 as we can see in the next image:

To check the available containers we can run:
# swift list

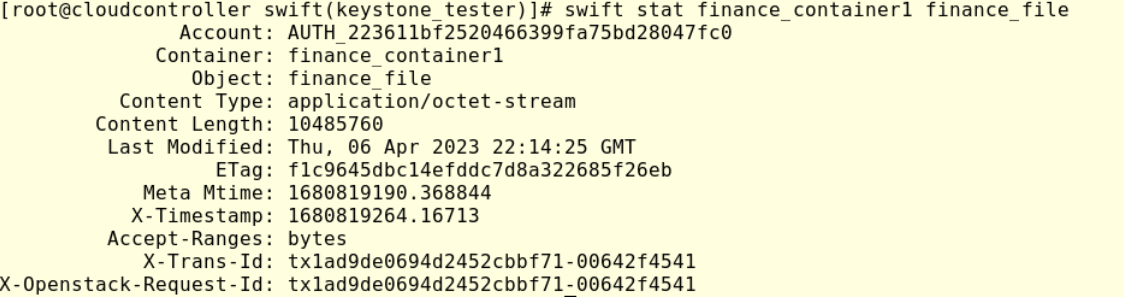
Additionally, we can check a specific object running:
#swift stat finance_container1 finance_file
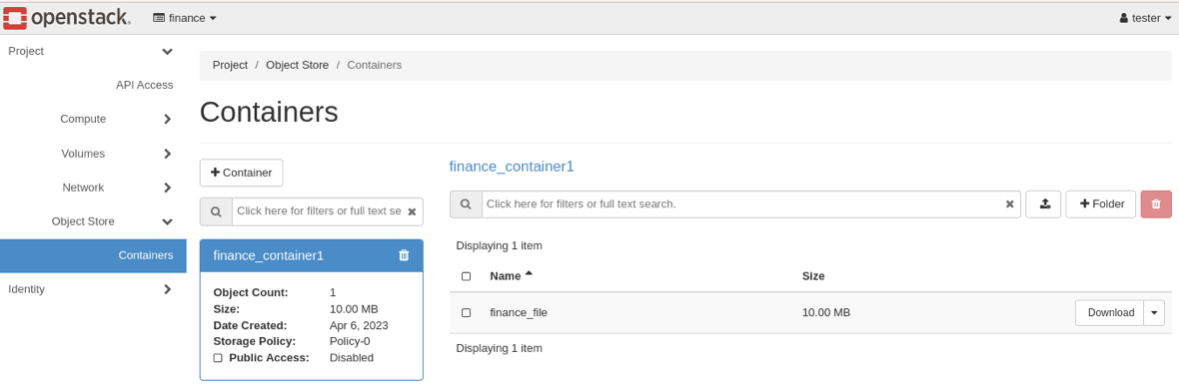
Or we can log in in the Horizon, then click in Object Store > Containers section:
To download the file previously uploaded we can run the command swift download, but first, let’s create the directory “download,” go inside that new folder and run:
#swift download finance_container

We will see the file finance_file was successfully downloaded.
Another way is uploading a directory, as follows:
- Create a new directory finance_directory
- Create two 10 Mb new files in finance_directory

Then, run:
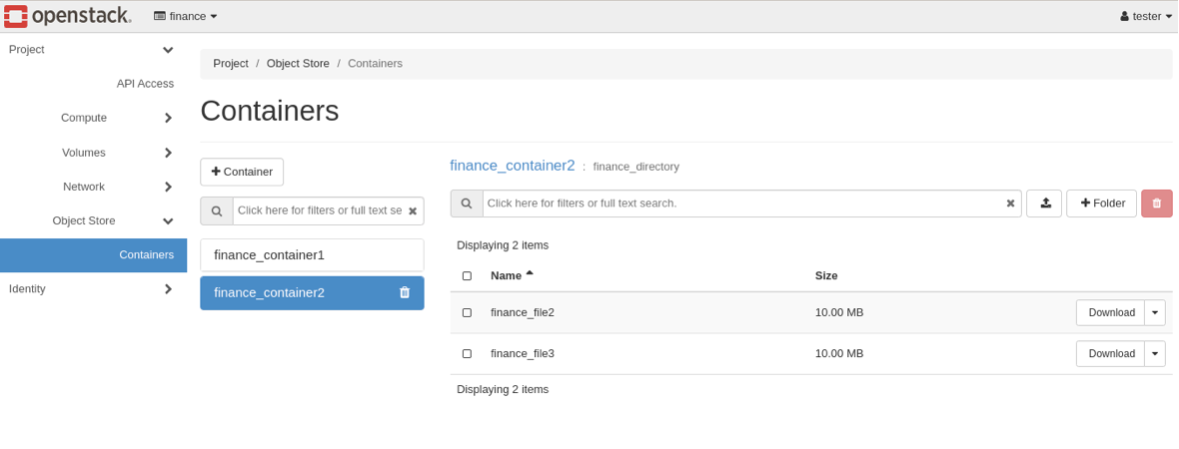
#swift upload finance_container2 finance_directory/

The action above will create a new container finance_container2, we can verify running:
#swift list,  to check the available containers

#swift list finance_container2 to check the content of the container

Again we can go to Horizon and check:
Manage permissions on a container in object storage
Swift allows configuring who can access the objects in a given container, to do that swift implements ACL in which we can declare external projects, and users either read or write the objects located in a container.
One thing to highlight is that, if we want to set up written permission for a given user we need to set up “read” permission first.
So now, let’s manage permissions on a container in Swift.
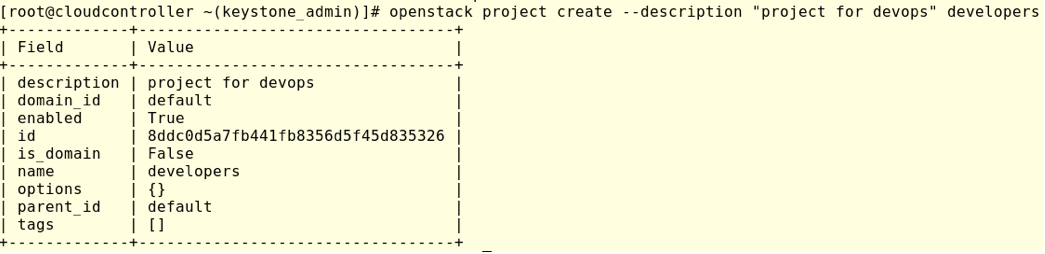
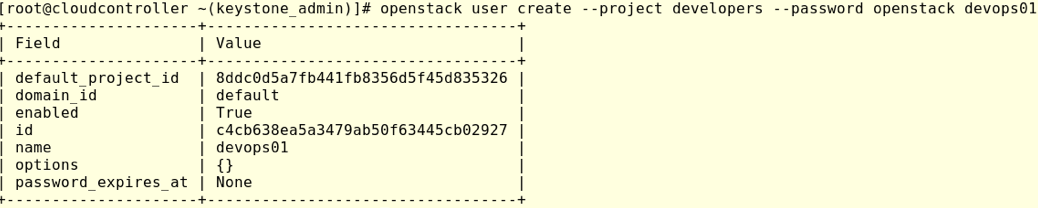
First, let’s create another project named developers and a new user devops01, so switch to admin’ run control file as follows:
#source keystonerc_admin:
Then:
#openstack project create –description “project for devops” developers
#openstack user create –project developers –password openstack devops01
Finally, set up the role for the user devops01 as follows:
#openstack role add --user devops01 --project developers _member_
For this OpenStack article I’m trying to do everything via the OpenStack CLI utility, so let’s create a new OpenStack run control file for the developers’ project named keystonerc_developers:
– Go to Horizon login using devops01 credentials and click in the top right corner, in the user icon, then, click on the OpenStack RC file
Upload the new run control file to the cloud controller node, then, source the env parameters running:
# source keystonerc_developers
We can verify if the new run control file is working running:
#openstack project list

Next, let’s configure the swift permissions to allow devops01 user to read and upload files to finance_container2
Load finance rc file:
#source keystonetc_finance
Then, check configured ACL in finance_container2 running:
#swift stat finance_container2
Focus on Read ACL and Write ACL, at this point, there is no ACL configured, so let’s add read permission to devops01 user running:
#swift post finance_container2 -r “developers:devops01”
and
#swift stat finance_container2
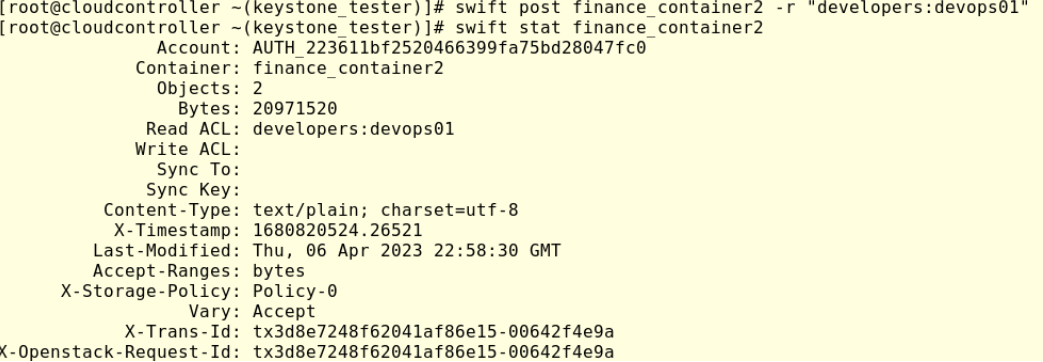
Check now Read the ACL line, you will see a new entry. This new ACL means that user dvops01 which belongs to developers’ projects has permission to list and download objects from the finance_container2.
Now, let’s load developers run control file, but first, we need to know the finance accounting API link, so still as a finance project user run:
# swift auth

This command will provide the finance endpoint to access object storage accounting (copy OS_STOREAGE_URL)that belongs to the project finance.
To check if devops01 user has permission to read objects in finance_container2, load developers run control file:
#source keystonerc_developers
Create a new variable SURL and set the OS_STOREAGE_URL value as follows:
#SURL=http://10.60.0.20:8080/v1/AUTH_223611bf2520466399fa75bd28047fc0
Run:
#swift –os-storage-url=’${SURL}’ list

With the command above we are trying to read all the containers in finance project, however, devops01 user only has access to one container finance_container2, which is the reason why we are getting a Failed transaction error.
To fix that execute:
#swift –os-storage-url=’${SURL}’ list finance_container2

As we can see, devops01 user is able to read the objects in finance_container2.
Let’s add written permission to devops01, to do that let’s comeback as finance user, so source finance rc file:
#source keystonerc_finance
And run:
swift post finance_container2 -w “developers:devops01”
And:
#swift stat finance_container2
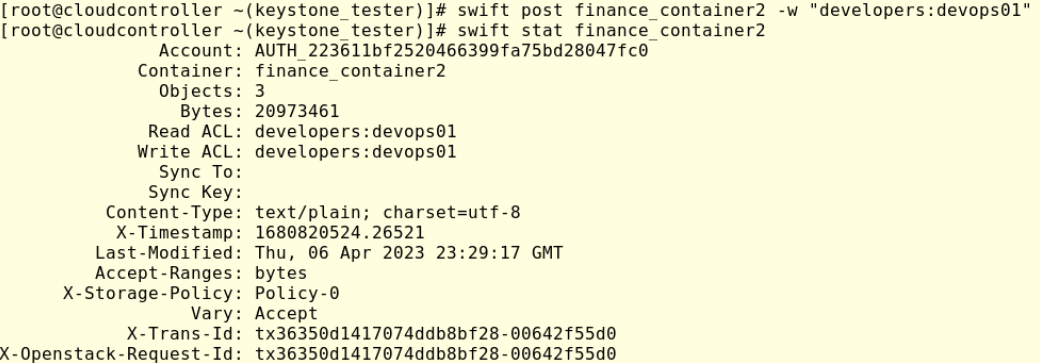
Again check the Write ACL line, we can see that devops01 user has now written permission in finance_container2, let’s check that:
Load developers run control file:
#source keystonerc_developers
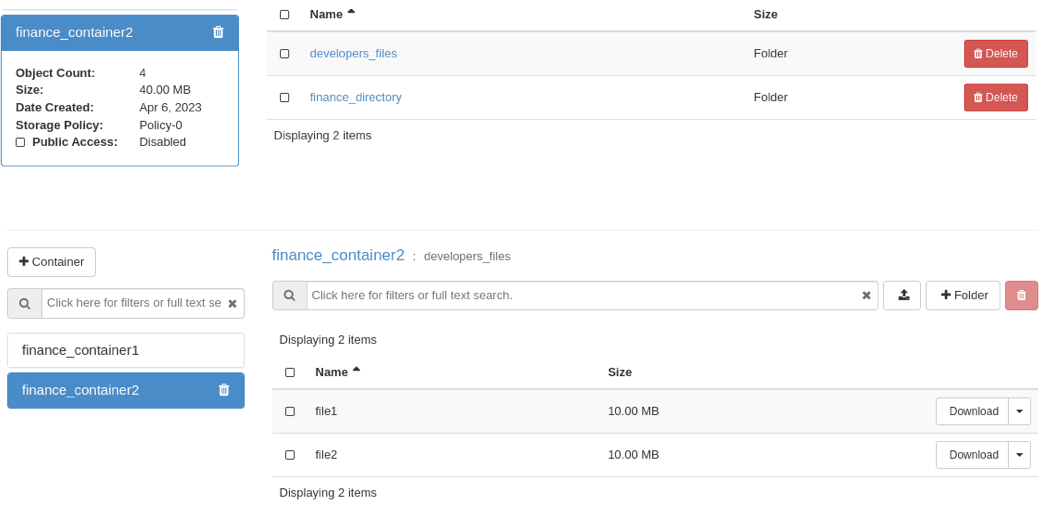
Create a new folder “developers_files” and create two new files.

Let’s upload the new folder we created previously:
#swift –os-storage-url=’${SURL}’ upload finance_container2 developers_files

We can now check Horizon(login as tester) the new object was uploaded by devops01 user.
Managing Expiring Objects
Another feature available to manage objects inside Swift is the possibility to set an expiring time for a given object. There are two mechanisms to set an expiring time:
- X-Delete-After
- X-Delete-At
X-Delete-After: the object will be removed from the object storage service once the time reaches the seconds we provide in the swift command.
Sample:
swift post finance_container2 developers_files/file1 -H "X-Delete-After:10"
The command above will remove file1 10 seconds after the command was executed.
X-Delete-At: will remove the object at a given date. One thing to note here is that we need to provide the time in epoch format or Unix Timestamp Converter.
To get the current time in epoch format run:
#date +”%s”
To schedule a removal date for a given object we can run:
Swift post finance_container2 developers_files/file2 -H “X-Delete-At:1680827850”


With the content above we are covering the Object Storage knowledge required for the COA Exam:
- Object Storage – 5%
- Using the command line client to upload and manage files to Swift containers.
- Managing permissions on a container in object storage.
- Working with Swift, the Object Storage service in OpenStack - April 21, 2023
- Part 2 – How to Restore Volumes and Snapshots in OpenStack - March 27, 2023
- Part 1 – How to Back Up in OpenStack - March 27, 2023