)
Check out the previous article for option one.
Option 2: Dedicated hardware for clusters
This option will describe how to move current MariaDB and RabbitMQ clusters to standalone nodes. This approach can be used to offload control-planes and provide dedicated resources for clusters.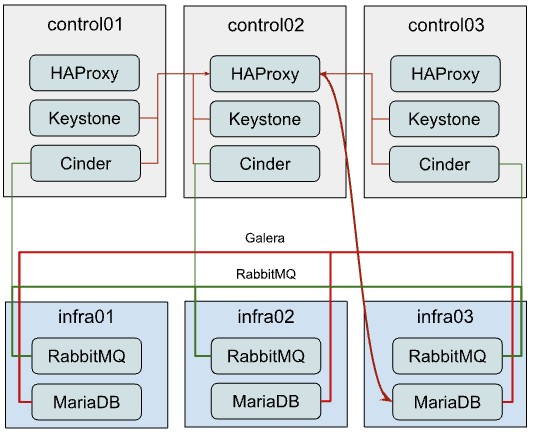
While it’s quite straightforward to establish the architecture above from the very beginning of the deployment, flawless migration of the existing deployment to such a setup is more tricky, as you need to migrate running clusters to the new hardware. Since we will be performing moves one-by-one, to preserve at least two active cluster members, the steps below should be repeated for the other two members.
Migrating MariaDB to the new hardware
The first thing to do is to list current members of the MariaDB cluster. For that, you can issue the following ad-hoc command:
root@deploy:/opt/openstack-ansible# ansible -m debug -a "var=groups['galera']" localhost

localhost | SUCCESS => {

    "groups['galera']": [
        "control01_galera_container-68e1fc47",
        "control02_galera_container-59576533",
        "control03_galera_container-f7d1b72b"
    ]
}
root@deploy:/opt/openstack-ansible#
Unless overridden, the first host in the group is considered as a “bootstrap” one. This bootstrap host should be migrated last to avoid unnecessary failovers, so it is recommended to start the migration of hosts to the new hardware from the last one to the first one in the output.
Once we’ve figured out the execution order, it’s time for a step-by-step guide.
- Remove the last container in the group using the following playbook:
openstack-ansible playbooks/lxc-containers-destroy.yml --limit control03_galera_container-f7d1b72b - Clean up the removed container from the inventory:
./scripts/inventory-manage.py -r control03_galera_container-f7d1b72b
Re-configure openstack_user_config to create a new container
Assuming, you currently have a config like the one below in your openstack_user_config.yml:
_control_hosts: &control_hosts
  control01:
    ip: 172.29.236.11
  control02:
    ip: 172.29.236.12
  control03:
    ip: 172.29.236.13

shared-infra_hosts: *control_hosts
Convert it to something like this:
_control_hosts: &control_hosts
  control01:
    ip: 172.29.236.11
  control02:
    ip: 172.29.236.12
  control03:
    ip: 172.29.236.13

memcaching_hosts: *control_hosts
mq_hosts: *control_hosts
operator_hosts: *control_hosts

database_hosts:
  control01:
    ip: 172.29.236.11
  control02:
    ip: 172.29.236.12
  infra03:
    ip: 172.29.236.23
In the example above we de-couple each service that is part of the shared-infra_hosts and define them separately, along with providing MariaDB its new destination host.
- Create the container on the new infra node:
openstack-ansible playbooks/lxc-containers-create.yml --limit infra03,galera
Please note, that new infra hosts should be prepared before this step (i.e., by running setup-hosts.yml playbook against them).
- Install MariaDB to this new container and add it to the cluster:
openstack-ansible playbooks/galera-install.yml - Once the playbook is finished, you can ensure that the cluster is in the Synced state and has proper cluster_size with the following ad-hoc:
ansible -m command -a "mysql -e \"SHOW STATUS WHERE Variable_name IN ('wsrep_local_state_comment', 'wsrep_cluster_size', 'wsrep_incoming_addresses')\"" neutron_galera - If the cluster is healthy, repeat steps 1-6 for the rest instances, including the “bootstrap” one.
Migrating RabbitMQ to the new hardware
The process of RabbitMQ migration will be pretty much the same as MariaDB with one exception – we need to preserve the same IP addresses for containers when moving them to the new hardware. Otherwise, we would need to re-configure all services (like cinder, nova, neutron, etc.) that rely on RabbitMQ as well, as contrary to MariaDB which is balanced through HAProxy, it’s a client who decides to which RabbitMQ backend it will connect.
Thus, we also don’t care about the order of migration.
Since we need to preserve an IP address, let’s collect this data before taking any actions against the current setup:
# ./scripts/inventory-manage.py -l | grep rabbitmq
| control01_rabbit_mq_container-a3a802ac  | None     | rabbitmq   | control01          | None           | 172.29.239.49  | None                 |
| control02_rabbit_mq_container-51f6cf7c  | None     | rabbitmq   | control02          | None           | 172.29.236.82  | None                 |
| control03_rabbit_mq_container-b30645d9  | None     | rabbitmq   | control03          | None           | 172.29.238.23  | None                 |
Before dropping the RabbitMQ container, it’s worth transitioning the RabbitMQ instance to the Maintenance mode, so it could offload its responsibilities to other cluster members and close connections to clients properly. You can use the following ad-hoc for that:
root@deploy:/opt/openstack-ansible# ansible -m command -a "rabbitmq-upgrade drain" control01_rabbit_mq_container-a3a802ac

control01_rabbit_mq_container-a3a802ac | CHANGED | rc=0 >>
Will put node rabbit@control01-rabbit-mq-container-a3a802ac into maintenance mode. The node will no longer serve any client traffic!
- Now we can proceed with container removal:
openstack-ansible playbooks/lxc-containers-destroy.yml --limit control01_rabbit_mq_container-a3a802ac
- And remove it from the inventory:
./scripts/inventory-manage.py -r control01_rabbit_mq_container-a3a802ac
Now you need to re-configure openstack_user_config similar to how it was done for MariaDB. The resulting record at this stage for RabbitMQ should look like this:
mq_hosts:
  infra01:
    ip: 172.29.236.21
  control02:
    ip: 172.29.236.12
  control03:
    ip: 172.29.236.13
Note: Ensure that you don’t have more generic shared-infra_hosts defined.
Now we need to manually re-generate the inventory and ensure that a new record was mapped to our infra01:
./inventory/dynamic_inventory.py
...

./scripts/inventory-manage.py -l | grep rabbitmq

| control02_rabbit_mq_container-51f6cf7c  | None     | rabbitmq   | control02          | None           | 172.29.236.82  | None                 |
| control03_rabbit_mq_container-b30645d9  | None     | rabbitmq   | control03          | None           | 172.29.238.23  | None                 |
| infra01_rabbit_mq_container-10ec4732  | None     | rabbitmq   | infra01          | None           | 172.29.238.248 | None                 |
As you might see from the output above, a record for the new container has been generated and assigned correctly to the infra01 host. Though this container has a new IP address, we need to preserve it. So we manually replaced the new IP with the old one in the inventory file and ensured it’s the proper one now:
sed -i 's/172.29.238.248/172.29.239.49/g' /etc/openstack_deploy/openstack_inventory.json


./scripts/inventory-manage.py -l | grep rabbitmq

| control02_rabbit_mq_container-51f6cf7c  | None     | rabbitmq   | control02          | None           | 172.29.236.82  | None                 |
| control03_rabbit_mq_container-b30645d9  | None     | rabbitmq   | control03          | None           | 172.29.238.23  | None                 |
| infra01_rabbit_mq_container-10ec4732  | None     | rabbitmq   | infra01          | None           | 172.29.239.49 | None                 |
- Now you can proceed with container creation:
openstack-ansible playbooks/lxc-containers-create.yml --limit infra01,rabbitmq - And install RabbitMQ to the new container and ensure it’s part of the cluster:
openstack-ansible playbooks/rabbitmq-install.yml - Once the cluster is re-established, it’s worth to clean-up cluster status with regards to the old container name still being considered as “Disk Node”, since the container name has changed:
root@deploy:/opt/openstack-ansible# ansible -m command -a "rabbitmqctl forget_cluster_node rabbit@control01-rabbit-mq-container-a3a802ac" rabbitmq[0]Note: You can take the cluster node name to remove from the output at step two.
- Repeat the steps above for the rest of the instances.
- Scaling OpenStack-Ansible Deployment: RabbitMQ and MariaDB – Option Three - August 27, 2023
- Scaling OpenStack-Ansible Deployment: RabbitMQ and MariaDB – Option Two - August 26, 2023
- Scaling OpenStack-Ansible Deployment: RabbitMQ and MariaDB – Option One - August 25, 2023


