So let’s get back to the exciting stuff. If you have no clue about what I’m talking about, then you’ve most likely missed Part 1: The Neighborhood. If you have some idea about the series but are feeling a little lost, then you probably skipped Part 2: Getting to know OpenStack better. I suggest that you skim through them to get a better perspective on what we’re about to do.
Recap of first two posts:
- You were introduced to OpenStack.
- You learned the basic survival elements of OpenStack and how to set them up for a basic OpenStack install.
- You got the keys, took it for a spin, saw money-making potential and figured that it handles well and possesses some serious networking chops.
- You are revved up!
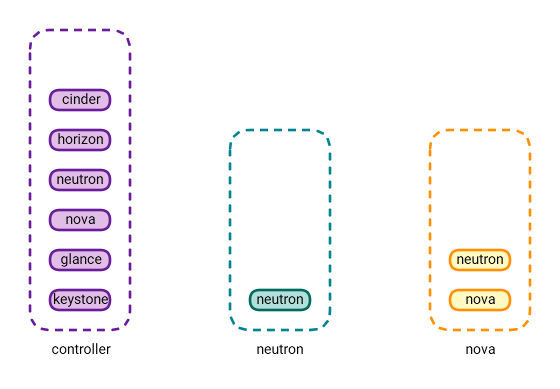
Confused? Don’t be. The diagram below depicts the current state of OpenStack at the end of the second tutorial.

At this point, we’ve configured the following:
| Function | Module |
| User authentication | Keystone |
| Image service | Glance |
| Compute | Nova |
| Networking | Neutron |
| GUI (graphical user interface) | Horizon |
Is it time to heat things up? No, not yet! Before we can do that, we have got to work our way around the block. So let’s look at one more piece in this puzzle.
What we’re going to set up next is block storage. You may ask, “what’s that?” Well, you’re going to be running some cloud instances for your customers (or tenants) and these customers will need to store the data in some sort of persistent storage (fancy name for storage that can persist beyond reboots and beyond the life of the cloud instance itself.)
Cinder is the module that allows you to provide additional persistent storage to your cloud instances or other cloud services. In simpler terms, it provides additional disks to your customer machines in the cloud.
F. Cinder

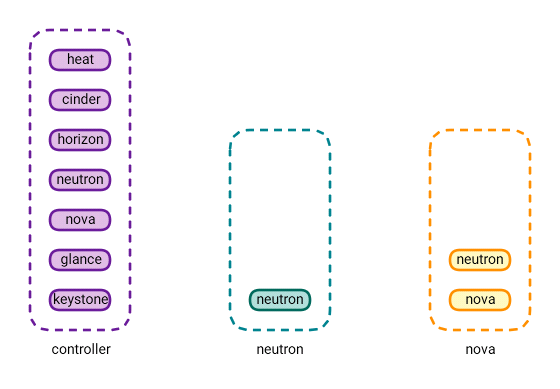
In the lab environment, we’re going to set up the Cinder service on the “controller” node. In a production environment, you’d want to have independent Cinder Nodes. Note that this will host the disks for your customers, so the workload on these nodes will be I/O intensive (Disk I/O).
There are multiple ways to handle the back-end storage for the Cinder nodes. For our lab environment, we’re using a local disk on the controller. In a production environment, this could be a disk mounted on your storage node from a storage area network, network attached storage or a distributed storage like Ceph. (The specifics of the back-end storage are beyond the scope of this tutorial, however.)
For now, in order to configure Cinder, please perform the following configuration:
Note on the syntax: these are covered in the previous posts, but for the benefit of the new readers please note the following:
- @<servername> (means that you need to do the configuration that follows, on that server
- Whenever you see sudo vi <filename> that means that you need to edit that file and the indented text that follows is what needs to be edited in that file.
- OS means OpenStack
@controller (note that even if your storage node is separate, this configuration still needs to be done on the controller and NOT on the storage node)
Create the database and assign the user appropriate rights:
sudo mysql -u root -p
  CREATE DATABASE cinder;
  GRANT ALL PRIVILEGES ON cinder.* TO 'cinder'@'localhost' \
  IDENTIFIED BY 'MINE_PASS';
  GRANT ALL PRIVILEGES ON cinder.* TO 'cinder'@'%' \
  IDENTIFIED BY 'MINE_PASS';
  exit
Source the keystone_admin file to get OS command-line access
source ~/keystone_adminCreate the Cinder user
openstack user create --domain default --password-prompt cinderAdd the role for the Cinder user:
openstack role add --project service --user cinder adminCinder requires two services for operation. Create the required services:
openstack service create --name cinder   --description "OpenStack Block Storage" volume
openstack service create --name cinderv2   --description "OpenStack Block Storage" volumev2
Create the respective endpoints for each service:
openstack endpoint create --region RegionOne   volume public http://controller:8776/v1/%\(tenant_id\)s
openstack endpoint create --region RegionOne   volume internal http://controller:8776/v1/%\(tenant_id\)s
openstack endpoint create --region RegionOne   volume admin http://controller:8776/v1/%\(tenant_id\)s
openstack endpoint create --region RegionOne   volumev2 public http://controller:8776/v2/%\(tenant_id\)s
openstack endpoint create --region RegionOne   volumev2 internal http://controller:8776/v2/%\(tenant_id\)s
openstack endpoint create --region RegionOne   volumev2 admin http://controller:8776/v2/%\(tenant_id\)s
Perform the Cinder software installation
sudo apt install cinder-api cinder-schedulerPerform the edit on the Cinder configuration file:
sudo vi /etc/cinder/cinder.conf

 [DEFAULT]
 auth_strategy = keystone
 #Define the URL/credentials to connect to RabbitMQ
 transport_url = rabbit://openstack:RABBIT_PASS@controller
 #This is the Ip of the storage node (in our case it is the controller node)
 my_ip = 10.30.100.215

 [database]
 # Tell cinder how to connect to the database. Comment out any existing connection   lines.
 connection = mysql+pymysql://cinder:MINE_PASS@controller/cinder

 # Tell cinder how to connect to keystone
 [keystone_authtoken]
 auth_uri = http://controller:5000
 auth_url = http://controller:35357
 memcached_servers = controller:11211
 auth_type = password
 project_domain_name = default
 user_domain_name = default
 project_name = service
 username = cinder
 password = MINE_PASS

 [oslo_concurrency]
 lock_path = /var/lib/cinder/tmp
Populate the Cinder database
sudo su -s /bin/sh -c "cinder-manage db sync" cinderConfigure the compute service to use cinder for block storage.
sudo vi /etc/nova/nova.conf
 [cinder]
 os_region_name = RegionOne
Restart Nova for the config changes to take effect.
sudo service nova-api restartStart the Cinder services on the controller.
sudo service cinder-scheduler restart
sudo service cinder-api restart
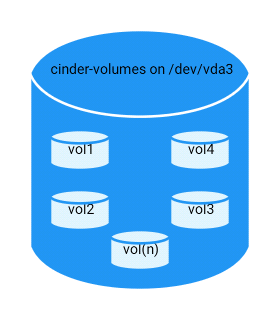
Now, there are certain items that warrant some explanation. First of all we are going to use the LVM driver to manage logical volumes for our disks. For our lab environment, note that we have an empty partition on a disk on /dev/vda3. This is the partition that will host all the Cinder volumes that we will provide to our customers. For your environment, please substitute this with the respective name/path of the empty disk/partition you want to use.
@controller (or your storage node if your storage node is a separate one)
First we install the supporting utility for lvm.
sudo apt install lvm2Now we set up the disk. The first command initializes the partition on our disk (or the whole disk if you are using a separate disk). As stated above, please replace the disk name with the appropriate one in your case.
pvcreate /dev/vda3The below command creates a volume group on the disk/partition that we initialized above. We use the name ‘cinder-volumes’ for the volume group. This volume group will contain all the cinder volumes (disks for the customer cloud instances).
vgcreate cinder-volumes /dev/vda3Below is a filter that needs to be defined in order to avoid performance issues and other complications on the storage node (according to official documentation). What happens is that, by default, the LVM scanning tool scans the /dev directory for block storage devices that contain volumes. We only want it to scan the devices that contain the cinder-volumes group (since that contains the volumes for OS).
Configure the LVM configuration file as follows:
sudo vi /etc/lvm/lvm.conf
 devices {
 ...
 filter = [ "a/vda2/", "a/vda3/", "r/.*/"]
a in the filter is for accept and the remaining is a regular expression. The line ends with “r/.*/” which rejects all remaining devices. But wait a minute; the filter is showing vda3, which is fine (since that contains the cinder-volumes), but what is vda2 doing there? According to the OS documentation if the storage node uses LVM on the operating system disk then we must add the associated device to the filter. For the lab /dev/vda2 is the partition that contains the operating system.

Install the volume service software:
sudo apt install cinder-volumeEdit the configuration file for Cinder:
sudo vi /etc/cinder/cinder.conf

 [DEFAULT]
 auth_strategy = keystone
 #Tell cinder how to connect to RabbitMQ
 transport_url = rabbit://openstack:MINE_PASS@controller
 #This is the IP of the storage node (controller for the lab)
 my_ip = 10.30.100.215
 #We are using the lvm backend (This is the name of the section we will define later in the file)
 enabled_backends = lvm
 glance_api_servers = http://controller:9292
 lock_path = /var/lib/cinder/tmp

 #Cinder DB connection. Comment out any existing connection entries.
 [database]
 connection = mysql+pymysql://cinder:MINE_PASS@controller/cinder

 #Tell cinder how to connect to keystone
 [keystone_authtoken]
 auth_uri = http://controller:5000
 auth_url = http://controller:35357
 memcached_servers = controller:11211
 auth_type = password
 project_domain_name = default
 user_domain_name = default
 project_name = service
 username = cinder
 password = MINE_PASS

 #This is the backend subsection
 [lvm]
 #Use the LVM driver
 volume_driver = cinder.volume.drivers.lvm.LVMVolumeDriver
 #This is the name of the volume group we created using the vgcreate command. If you changed the name use the changed name here.
 volume_group = cinder-volumes
 #The volumes are provided to the instances using the ISCSI protocol
 iscsi_protocol = iscsi
 iscsi_helper = tgtadm
Start the block storage service and the dependencies:
sudo service tgt restart
sudo service cinder-volume
Verify Operation
@controller
Source the OS command line:
source ~/keystone_adminList the cinder services and ensure the status is up:
openstack volume service list
+------------------+---------------------------+------+---------+-------+----------------------------+
| Binary           | Host                      | Zone | Status  | State | Updated At                 |
+------------------+---------------------------+------+---------+-------+----------------------------+
| cinder-scheduler | controller                | nova | enabled | up    | 2016-12-14T07:24:22.000000 |
| cinder-volume    | controller@lvm            | nova | enabled | up    | 2016-12-14T07:24:22.000000 |
+------------------+---------------------------+------+---------+-------+----------------------------+
Since we worked so hard on this, let’s do further verification. Let’s try and create a 1GB test volume.
openstack volume create --size 1 test-vol
+---------------------+--------------------------------------+
| Field               | Value                                |
+---------------------+--------------------------------------+
| attachments         | []                                   |
| availability_zone   | nova                                 |
| bootable            | false                                |
| consistencygroup_id | None                                 |
| created_at          | 2016-12-14T07:28:59.491675           |
| description         | None                                 |
| encrypted           | False                                |
| id                  | f6ec46ca-9ccf-47fb-aaea-cdde4ad9644e |
| migration_status    | None                                 |
| multiattach         | False                                |
| name                | test-vol                             |
| properties          |                                      |
| replication_status  | disabled                             |
| size                | 1                                    |
| snapshot_id         | None                                 |
| source_volid        | None                                 |
| status              | creating                             |
| type                | None                                 |
| updated_at          | None                                 |
| user_id             | 97b1b7d8cb0d473c83094c795282b5cb     |
+---------------------+--------------------------------------+
Now let’s list the volumes in the environment and ensure that the volume you just created appears with Status = available.
openstack volume list
+--------------------------------------+--------------+-----------+------+------------------------------+
| ID                                   | Display Name | Status    | Size | Attached to                  |
+--------------------------------------+--------------+-----------+------+------------------------------+
| f6ec46ca-9ccf-47fb-aaea-cdde4ad9644e | test-vol     | available |    1 |                              |
+--------------------------------------+--------------+-----------+------+------------------------------+
Congratulations! You’ve reached a significant milestone. You have a fully functioning OpenStack all to yourself. If you’re following along these episodes and have successfully verified the operations of the respective modules, then give yourself a pat on the back.
When we started this series, I explained to you that OpenStack is complex, not complicated. It is comprised of a number of parts (services) that work together to bring to us the whole OpenStack experience. We have been introduced to the main characteristics of OpenStack, which ones like to work with which and what the basic functions for each are.
By now you’re wondering, “Where’s the heat?” Finally let me introduce you to one of my favorite characteristics of OpenStack, the orchestration service Heat.
G. Heat

Heat is a service that manages orchestration. What’s that? Let me take you through some examples. Let’s say you have a new customer. This customer will require certain networks, cloud instances, routers, firewall rules, etc. One way to achieve this is to use the OpenStack command line tool or the Horizon GUI.
Both of these are good methods, however they are time consuming, require manual intervention and are prone to human error. What if I told you that there is a way to automate most of these things and standardize them using templates so you can reuse them across customers? That’s what Heat does. It automates the facilitation of services to your guests (cloud customers). Please perform the following configuration to setup heat on the controller node:
@controller
Create the heat database and assign full user rights:
sudo mysql -u root -p
 CREATE DATABASE heat;
 GRANT ALL PRIVILEGES ON heat.* TO 'heat'@'localhost' \
 IDENTIFIED BY 'MINE_PASS';
 GRANT ALL PRIVILEGES ON heat.* TO 'heat'@'%' \
 IDENTIFIED BY 'MINE_PASS'
 exit
Source the OS command line:
source ~/keystone_adminCreate the Heat user:
openstack user create --domain default --password-prompt heatAssign the role to the Heat user:
openstack role add --project service --user heat adminCreate the Heat service (it requires two services):
openstack service create --name heat --description "Orchestration" orchestration
openstack service create --name heat-cfn --description "Orchestration"  cloudformation
Create the respective service endpoints:
openstack endpoint create --region RegionOne orchestration public http://controller:8004/v1/%\(tenant_id\)s
openstack endpoint create --region RegionOne orchestration public http://controller:8004/v1/%\(tenant_id\)s
openstack endpoint create --region RegionOne orchestration admin http://controller:8004/v1/%\(tenant_id\)s

openstack endpoint create --region RegionOne cloudformation public http://controller:8000/v1
openstack endpoint create --region RegionOne cloudformation internal http://controller:8000/v1
openstack endpoint create --region RegionOne cloudformation admin http://controller:8000/v1
Heat requires a special domain in OpenStack to operate. Create the respective domain:
openstack domain create --description "Stack projects and users" heatCreate the domain admin for the special heat domain:
openstack user create --domain heat --password-prompt heat_domain_adminAdd the role for the heat_domain_admin:
openstack role add --domain heat --user-domain heat --user heat_domain_admin adminCreate this new role. You can add this role to any user in OpenStack who needs manage Heat stacks (Stacks are a way to represent the application of Heat templates and what they are doing in a certain scenario. More on this later.)
openstack role create heat_stack_owner(Optional) Let’s say you have a user Customer1 in a project customer1_admin. You can use the following command to allow this user to manage Heat stacks.
openstack role add --project Customer1 --user customer1_admin heat_stack_ownerCreate the heat_stack_user role:
openstack role create heat_stack_userNOTE: The Orchestration service automatically assigns the heat_stack_user role to users that it creates during the stack deployment. By default, this role restricts API operations. To avoid conflicts, do not add this role to users with the heat_stack_owner role.
Install the Heat software:
sudo apt-get install heat-api heat-api-cfn heat-engineConfigure the Heat config file:
sudo vi  /etc/heat/heat.conf
 [DEFAULT]
 rpc_backend = rabbit
 heat_metadata_server_url = http://controller:8000
 heat_waitcondition_server_url = http://controller:8000/v1/waitcondition
 #This is the domain admin we defined above
 stack_domain_admin = heat_domain_admin
 stack_domain_admin_password = MINE_PASS
 #This is the name of the special domain we defined for heat
 stack_user_domain_name = heat
 #Tell heat how to connect to RabbitMQ
 transport_url = rabbit://openstack:MINE_PASS@controller

 #Heat DB connection. Comment out any existing connection entries
 [database]
 connection = mysql+pymysql://heat:HEAT_DBPASS@controller/heat

 #Tell heat how to connect to keystone
 [keystone_authtoken]
 auth_uri = http://controller:5000
 auth_url = http://controller:35357
 memcached_servers = controller:11211
 auth_type = password
 project_domain_name = default
 user_domain_name = default
 project_name = service
 username = heat
 password = MINE_PASS

 #This section is required for identity service access
 [trustee]
 auth_type = password
 auth_url = http://controller:35357
 username = heat
 password = MINE_PASS
 user_domain_name = default

 #This section is required for identity service access
 [clients_keystone]
 auth_uri = http://controller:35357

 #This section is required for identity service access
 [ec2authtoken]
 auth_uri = http://controller:5000
Initialize the Heat DB:
sudo su -s /bin/sh -c "heat-manage db_sync" heatStart the Heat services:
sudo service heat-api restart
sudo service heat-api-cfn restart
sudo service heat-engine restart
Verify Operation:
Source the OpenStack command line:
source ~/keystone_adminList the Heat Services and ensure that the status is set to up as show below:
openstack orchestration service list
+-----------------------+-------------+--------------------------------------+-----------------------+--------+----------------------------+--------+
| hostname              | binary      | engine_id                            | host                  | topic  | updated_at                 | status |
+-----------------------+-------------+--------------------------------------+-----------------------+--------+----------------------------+--------+
| controller            | heat-engine | de08860a-8d30-483a-acd5-6cfef8cb7d77 | controller            | engine | 2016-12-14T07:53:42.000000 | up     |
| controller            | heat-engine | 859475c8-9b2a-4793-b877-e89a4f0920f8 | controller            | engine | 2016-12-14T07:53:42.000000 | up     |
| controller            | heat-engine | 4ca0a3bb-7c2b-4fe1-8233-82b7e0548b9a | controller            | engine | 2016-12-14T07:53:42.000000 | up     |
| controller            | heat-engine | d22b36b1-1467-4987-aa30-0ac9787450e1 | controller            | engine | 2016-12-14T07:53:42.000000 | up     |
+-----------------------+-------------+--------------------------------------+-----------------------+--------+----------------------------+--------+
Fantastic!
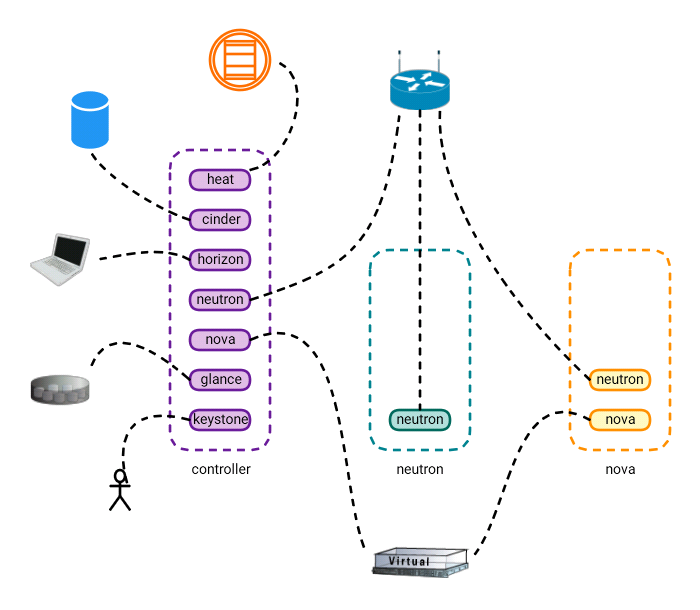
Look at how far you and OpenStack have come in only three posts. Take a look at the diagram below:

So at the end of Post-3 we have successfully setup most of the common OpenStack base services and, more importantly, understood the various configurations that allow these services to interconnect and work together. As always, I sincerely thank you for reading and your patience. If you have any questions/comments please feel free to share in the comments section below so everyone from different sources can benefit from the discussion.
This post first appeared as part of a Series of posts called “An OpenStack Series” on the WhatCloud blog. Superuser is always interested in community content, email: [email protected].
Cover Photo // CC BY NC
- Managing port level security in OpenStack - April 21, 2017
- Let’s heat things up with Cinder and Heat - April 7, 2017
- Getting to know the essential OpenStack components better - March 21, 2017

)


