GPU Passthrough in OpenStack allows a virtual machine (VM) to directly access the graphics processing unit (GPU) of a physical host. This allows the VM to take full advantage of the GPU’s capabilities, such as for tasks that require high-performance graphics or machine learning workloads. OpenStack is an open-source cloud computing platform that can be used to deploy and manage VMs, making it possible to use GPU Passthrough in a multi-tenant environment. However, configuring GPU Passthrough in OpenStack can be complex and requires specific hardware and software setup.
Preparation
To pass a GPU through to virtual machines, you will need to enable VT-d extensions in the BIOS.
The next step in preparing the GPU for passthrough is to ensure the proper drivers are configured. Run lspci command to get PCI bus ID, vendor ID and product ID.
sudo lspci -nn | grep NVIDIA
17:00.0 VGA compatible controller [0300]: NVIDIA Corporation TU102 [GeForce RTX 2080 Ti Rev. A] [10de:1e07] (rev a1)
17:00.1 Audio device [0403]: NVIDIA Corporation TU102 High Definition Audio Controller [10de:10f7] (rev a1)
17:00.2 USB controller [0c03]: NVIDIA Corporation TU102 USB 3.1 Host Controller [10de:1ad6] (rev a1)
17:00.3 Serial bus controller [0c80]: NVIDIA Corporation TU102 USB Type-C UCSI Controller [10de:1ad7] (rev a1)

In this example, the PCI bus ID is 17:00.0, the vendor ID is 10de and the product ID is 1e07.
The card now has the default driver.
sudo lspci -s 17:00.0 -k
17:00.0 VGA compatible controller: NVIDIA Corporation TU102 [GeForce RTX 2080 Ti Rev. A] (rev a1)
        Subsystem: ZOTAC International (MCO) Ltd. TU102 [GeForce RTX 2080 Ti Rev. A]
        Kernel driver in use: nouveau
        Kernel modules: nvidiafb, nouveau

sudo lspci -s 17:00.1 -k
17:00.1 Audio device: NVIDIA Corporation TU102 High Definition Audio Controller (rev a1)
        Subsystem: ZOTAC International (MCO) Ltd. TU102 High Definition Audio Controller
        Kernel driver in use: snd_hda_intel
        Kernel modules: snd_hda_intel

sudo lspci -s 17:00.2 -k
17:00.2 USB controller: NVIDIA Corporation TU102 USB 3.1 Host Controller (rev a1)
        Subsystem: ZOTAC International (MCO) Ltd. TU102 USB 3.1 Host Controller
        Kernel driver in use: xhci_hcd

sudo lspci -s 17:00.3 -k
17:00.3 Serial bus controller [0c80]: NVIDIA Corporation TU102 USB Type-C UCSI Controller (rev a1)
        Subsystem: ZOTAC International (MCO) Ltd. TU102 USB Type-C UCSI Controller
        Kernel driver in use: nvidia-gpu
        Kernel modules: i2c_nvidia_gpu

We will take every vendor ID and product ID of our GPU and add them to these config:
$ sudo nano /etc/initramfs-tools/modules
with the following contents:
vfio vfio_iommu_type1 vfio_virqfd vfio_pci ids=10de:1e07,10de:10f7,10de:1ad6,10de:1ad7
and
sudo nano /etc/modprobe.d/vfio.conf
with the following contents:
options vfio-pci ids=10de:1e07,10de:10f7,10de:1ad6,10de:1ad7
and
sudo nano /etc/modprobe.d/kvm.conf
with the following contents:
options kvm ignore_msrs=1
and
sudo nano /etc/modprobe.d/blacklist-nvidia.conf
with the following contents:
blacklist nouveau
blacklist nvidiafb
and
sudo nano /etc/default/grub
with the following contents:
GRUB_CMDLINE_LINUX_DEFAULT="intel_iommu=on vfio-pci.ids=10de:1e07,10de:10f7,10de:1ad6,10de:1ad7 vfio_iommu_type1.allow_unsafe_interrupts=1 modprobe.blacklist=nvidiafb,nouveau"
Refresh the grub configuration and reboot the server with:
$ sudo update-grub
$ reboot
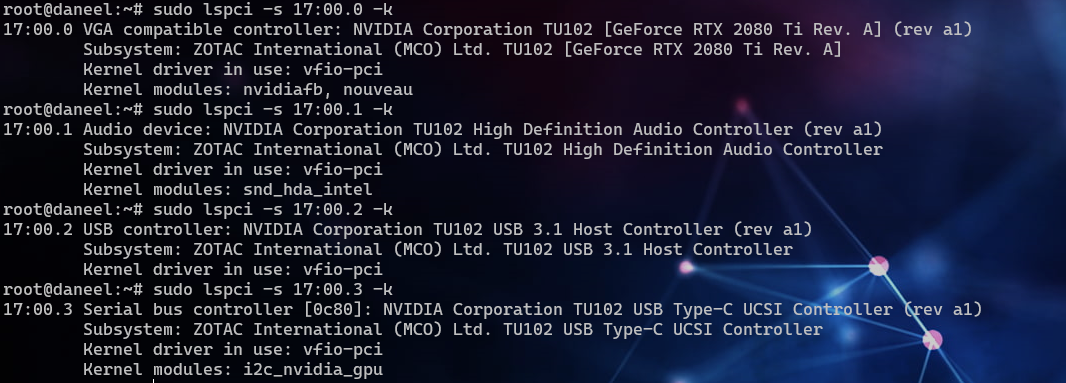
Once the server has returned, you can verify the proper driver has been bound using the following lspci command:
sudo lspci -s 17:00.0 -k
17:00.0 VGA compatible controller: NVIDIA Corporation TU102 [GeForce RTX 2080 Ti Rev. A] (rev a1)
        Subsystem: ZOTAC International (MCO) Ltd. TU102 [GeForce RTX 2080 Ti Rev. A]
        Kernel driver in use: vfio-pci
        Kernel modules: nvidiafb, nouveau

sudo lspci -s 17:00.1 -k
17:00.1 Audio device: NVIDIA Corporation TU102 High Definition Audio Controller (rev a1)
        Subsystem: ZOTAC International (MCO) Ltd. TU102 High Definition Audio Controller
        Kernel driver in use: vfio-pci
        Kernel modules: snd_hda_intel

sudo lspci -s 17:00.2 -k
17:00.2 USB controller: NVIDIA Corporation TU102 USB 3.1 Host Controller (rev a1)
        Subsystem: ZOTAC International (MCO) Ltd. TU102 USB 3.1 Host Controller
        Kernel driver in use: vfio-pci

sudo lspci -s 17:00.3 -k
17:00.3 Serial bus controller [0c80]: NVIDIA Corporation TU102 USB Type-C UCSI Controller (rev a1)
        Subsystem: ZOTAC International (MCO) Ltd. TU102 USB Type-C UCSI Controller
        Kernel driver in use: vfio-pci
        Kernel modules: i2c_nvidia_gpu

Nova config
First, configure PCI passthrough whitelist on the compute node.
sudo nano /etc/nova/nova.conf
Add the following at the end of the configuration, it should be like the this:
[pci]
passthrough_whitelist: { "vendor_id": "10de", "product_id": "1e07" }
Restart the nova compute service:
$ systemctl restart openstack-nova-*
Next, configure nova.conf on the API service node.
sudo nano /etc/nova/nova.conf
The configuration should be like the following:
[pci]
alias: { "vendor_id":"10de", "product_id":"1e07", "device_type":"type-PCI", "name":"geforce-rtx" }

[filter_scheduler]
enabled_filters = PciPassthroughFilter
available_filters = nova.scheduler.filters.all_filters
Lastly, ensure that the Nova scheduler has been configured with a PCI Passthrough filter.
sudo nano /etc/nova/nova.conf
The configuration should be like the following:
[filter_scheduler]
enabled_filters = PciPassthroughFilter
available_filters = nova.scheduler.filters.all_filters
Restart the nova scheduler service:
$ systemctl restart openstack-nova-*
Create a flavor
Create a flavor with the following command:
openstack flavor create \
--vcpus 2 \
--ram 4096 \
--disk 25 \
--property "pci_passthrough:alias"="geforce-rtx:1" \
gpu_flavor

The pci_passthrough:alias property referencing the geforce-rtx alias we configured earlier. The number 1 instructs nova that a single GPU should be assigned.
Configure image
The image that will be used, should have hidden the hypervisor id since NVIDIA drivers do not work in instances with KVM hypervisor signatures.
openstack image list

Image list:
openstack image set bb60850b-fd03-4afc-b0cd-e6eedb2fdf92 --property img_hide_hypervisor_id=true
Create an instance
openstack server create \
--flavor gpu_flavor \
--image bb60850b-fd03-4afc-b0cd-e6eedb2fdf92 \
--network LAN \
--key-name key \
gpu-server
Log in to the instance and verify the GPU is recognized:
root@test:~$ lspci | grep NVIDIA

Check the hypervisor id signature:
root@test:~$ sudo apt update
root@test:~$ sudo apt install cpuid
root@test:~$ cpuid|grep hypervisor_id
   hypervisor_id = "            "
   hypervisor_id = "            "
   hypervisor_id = "            "
   hypervisor_id = "            "
   hypervisor_id = "            "
   hypervisor_id = "            "
   hypervisor_id = "            "
   hypervisor_id = "            "
Now install nvidia drivers:
root@test:~$ sudo apt install ubuntu-drivers-common

root@test:~$ ubuntu-drivers devices
WARNING:root:_pkg_get_support nvidia-driver-390: package has invalid Support Legacyheader, cannot determine support level
== /sys/devices/pci0000:00/0000:00:05.0 ==
modalias : pci:v000010DEd000017C2sv000010DEsd00001132bc03sc00i00
vendor   : NVIDIA Corporation
model    : TU102 [GeForce Rtx 2080 ti]
driver   : nvidia-driver-455 - third-party non-free
driver   : nvidia-driver-470 - third-party non-free recommended
driver   : nvidia-driver-418-server - distro non-free
driver   : nvidia-driver-450 - third-party non-free
driver   : nvidia-driver-460 - third-party non-free
driver   : nvidia-driver-465 - third-party non-free
driver   : nvidia-driver-450-server - distro non-free
driver   : nvidia-driver-460-server - distro non-free
driver   : nvidia-driver-390 - distro non-free
driver   : xserver-xorg-video-nouveau - distro free builtin

root@test:~$  sudo apt install nvidia-driver-470
When the installation finishes reboot the instance:
root@test:~$ sudo reboot
After rebooting the instance, verify the new drivers have been installed and work correctly by typing nvidia-smi:

The driver works and we are ready to access the GPU.
Want to write a blog post or have an idea for a Superuser article? Fill out the form at openinfrafoundation.formstack.com/forms/superuser_pitch or email [email protected] to submit your pitch.

)


