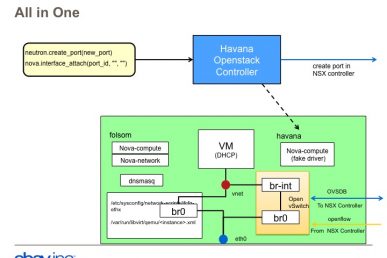
Open vSwitch is an open-source project that allows hypervisors to virtualize the networking layer. This caters for the large number of virtual machines running on one or more physical nodes. The virtual machines connect to virtual ports on virtual bridges (inside the virtualized network layer.)
This is very similar to a physical server connecting to physical ports on a Layer 2 networking switch. These virtual bridges then allow the virtual machines to communicate with each other on the same physical node. These bridges also connect these virtual machines to the physical network for communication outside the hypervisor node.
In OpenStack, both the Neutron node and the compute node (Nova) are running Open vSwitch to provide virtualized network services.
The basics
Open vSwitch provides some commands to look into the networking. Let’s examine a few of them:
- To list all OVS (Open vSwitch) bridges on the local system:
ovs-vsctl list-br
br-eth1
br-ex2
br-int
br-tun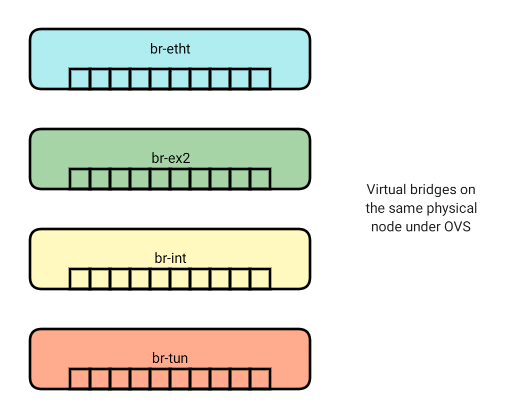
- To list all ports on a specific bridge:
ovs-vsctl list-ports br-int
int-br-eth1
int-br-ex2
patch-tun
Where br-int is the name of the bridge for which you want to list the ports.
- To list the ports with port numbers on a specific bridge:
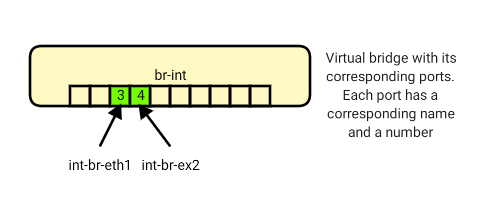
ovs-ofctl show br-int
OFPT_FEATURES_REPLY (xid=0x2): dpid:0000bacba8eb4f43
n_tables:254, n_buffers:256
capabilities: FLOW_STATS TABLE_STATS PORT_STATS QUEUE_STATS ARP_MATCH_IP
actions: OUTPUT SET_VLAN_VID SET_VLAN_PCP STRIP_VLAN SET_DL_SRC SET_DL_DST SET_NW_SRC SET_NW_DST SET_NW_TOS SET_TP_SRC SET_TP_DST ENQUEUE
 3(int-br-eth1): addr:76:d7:1d:3f:4e:c4
     config:     0
     state:      0
     speed: 0 Mbps now, 0 Mbps max
 4(int-br-ex2): addr:7e:d9:87:cc:ea:57
     config:     0
     state:      0
     speed: 0 Mbps now, 0 Mbps max
 LOCAL(br-int): addr:ba:cb:a8:eb:4f:43
     config:     PORT_DOWN
     state:      LINK_DOWN
     speed: 0 Mbps now, 0 Mbps max
OFPT_GET_CONFIG_REPLY (xid=0x4): frags=normal miss_send_len=0
int-br-eth1
int-br-ex2
patch-tun
The layout
So we now know what bridges exist on our system, what ports exist on these bridges and what the names of the ports are. Now let’s look at the layout of these bridges and how they connect to each other, virtual machines, name-spaces and the physical network. Run the following command to list the Open vSwitch layout on a particular system:
ovs-vsctl show
5ee56fdf-09b6-4f38-8de2-a699670bf8f7
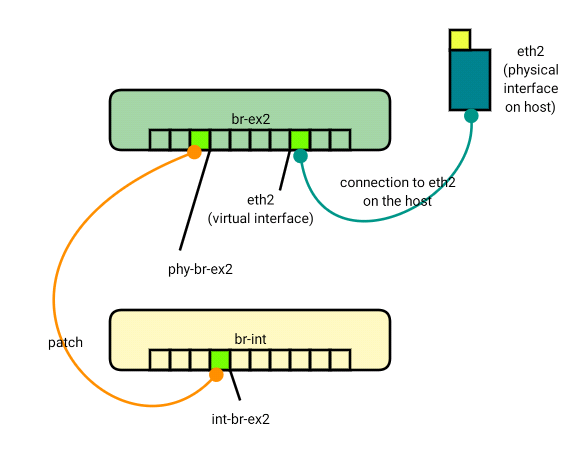
    Bridge "br-ex2"     << Bridge Name
        Port "phy-br-ex2"     << Port Name
            Interface "phy-br-ex2"
                type: patch     << Port Type
                options: {peer="int-br-ex2"}
        Port "br-ex2"
            Interface "br-ex2"
 type: internal
        Port "eth2"
            Interface "eth2"
    Bridge "br-eth1"
        Port "br-eth1"
            Interface "br-eth1"
                type: internal
        Port "phy-br-eth1"
            Interface "phy-br-eth1"
                type: patch
                options: {peer="int-br-eth1"}
        Port "eth1"
            Interface "eth1"
    Bridge br-int
        fail_mode: secure
        Port br-int
            Interface br-int
                type: internal
        Port "qr-476984a0-53"
            tag: 1
            Interface "qr-476984a0-53"
                type: internal
        Port "int-br-ex2"
            Interface "int-br-ex2"
                type: patch
                options: {peer="phy-br-ex2"}
        Port "int-br-eth1"
            Interface "int-br-eth1"
                type: patch
                options: {peer="phy-br-eth1"}
        Port "tapa3281257-92"
            tag: 1
            Interface "tapa3281257-92"
                type: internal
     ovs_version: "2.3.0"
The output is self-explanatory. It lists the bridges and all the ports under each bridge. Note that:
- Port “eth2“: eth2 is an OVS port that allows OVS to connect to the eth2 interface
- type: patch: Port type patch means that this port is patched to another port. It is similar to running a patch cable from one switch to another.
- options: {peer=”int-br-ex2″}: options on a patch port tells you the name of the port to which this port is patched.
- tag: 1: Tags the port with this vlan so traffic intended for vlan 1 is forwarded to this port.
The flows
Now we know the connectivity of the respective bridges. In the OVS setup, each bridge uses a set of rules (known as flows) that are used to manipulate and direct traffic coming in and going out. Run the following command to see the flows on a particular bridge:
ovs-ofctl dump-flows br-int
NXST_FLOW reply (xid=0x4):
 cookie=0x0, duration=166494.195s, table=0, n_packets=2783, n_bytes=167502, idle_age=347, hard_age=65534, priority=1 actions=NORMAL

 cookie=0x0, duration=166486.390s, table=0, n_packets=1578, n_bytes=119878, idle_age=347, hard_age=65534, priority=3,in_port=3,dl_vlan=1301 actions=mod_vlan_vid:1,NORMAL

 cookie=0x0, duration=166492.361s, table=0, n_packets=1053216, n_bytes=360266929, idle_age=0, hard_age=65534, priority=2,in_port=3 actions=drop

 cookie=0x0, duration=166491.657s, table=0, n_packets=6, n_bytes=306, idle_age=65534, hard_age=65534, priority=2,in_port=4 actions=drop

 cookie=0x0, duration=166485.255s, table=0, n_packets=52575, n_bytes=6500437, idle_age=11, hard_age=65534, priority=3,in_port=4,vlan_tci=0x0000 actions=mod_vlan_vid:2,NORMAL

 cookie=0x0, duration=166493.840s, table=23, n_packets=0, n_bytes=0, idle_age=65534, hard_age=65534, priority=0 actions=drop
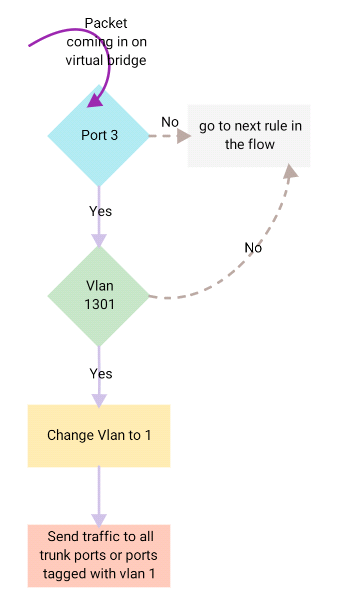
Each line can be roughly split into two sections. The first section is the match which is used to identify traffic to which this rule should be applied. If we look at Flow #2 the match part reads: in_port=3,dl_vlan=1301. This means that traffic that comes in on port 3 and has vlan 1301should match this flow. The second section is the action which defines what action should be taken on this traffic.
Looking at the same flow, actions=mod_vlan_vid:1,NORMAL, tells the bridge to modify the vlan tag on the packet to 1 and then continue with normal Layer 2processing. This traffic would then be sent on all trunk ports or ports marked with vlan 1. So in one go the rule works as follows:
A few other useful actions to know:
- actions=drop: Drops the matching packets
- actions=NORMAL: Continue with normal layer 2 processing.
Note that we can check the Port numbers from the ovs-ofctl show command and the port tagging from the ovs-vsctl show command.
We can use n_packets for troubleshooting traffic flows. For example, we could run a ping from one endpoint connected on one port of the OVS to an other and check the flows on each bridge to monitor which flow rule is being hit by the ping packets. The n_packets counter should increase for the flow that is processing the ping packets and we can follow the trail to figure out where the packets are being dropped in case of a connectivity issue.
In the OpenStack world, this would just mean pinging from one cloud instance to another for checking internal connectivity or pinging from the project router to the cloud instance or vice versa when checking connectivity to the external world.
Thank you for reading. If you have any questions/comments please feel free to share below in the comments section so everyone can benefit from the discussion.
This post from Nooruddin Abbas Ali Shah first appeared on WhatCloud blog. Superuser is always interested in community content, email: [email protected].
(T)imothep // CC BY
- Exploring the Open Infrastructure Blueprint: Huawei Dual Engine - September 25, 2024
- Open Infrastructure Blueprint: Atmosphere Deep Dive - September 18, 2024
- Datacomm’s Success Story: Launching A New Data Center Seamlessly With FishOS - September 12, 2024

)
